Playing Cards With Friends

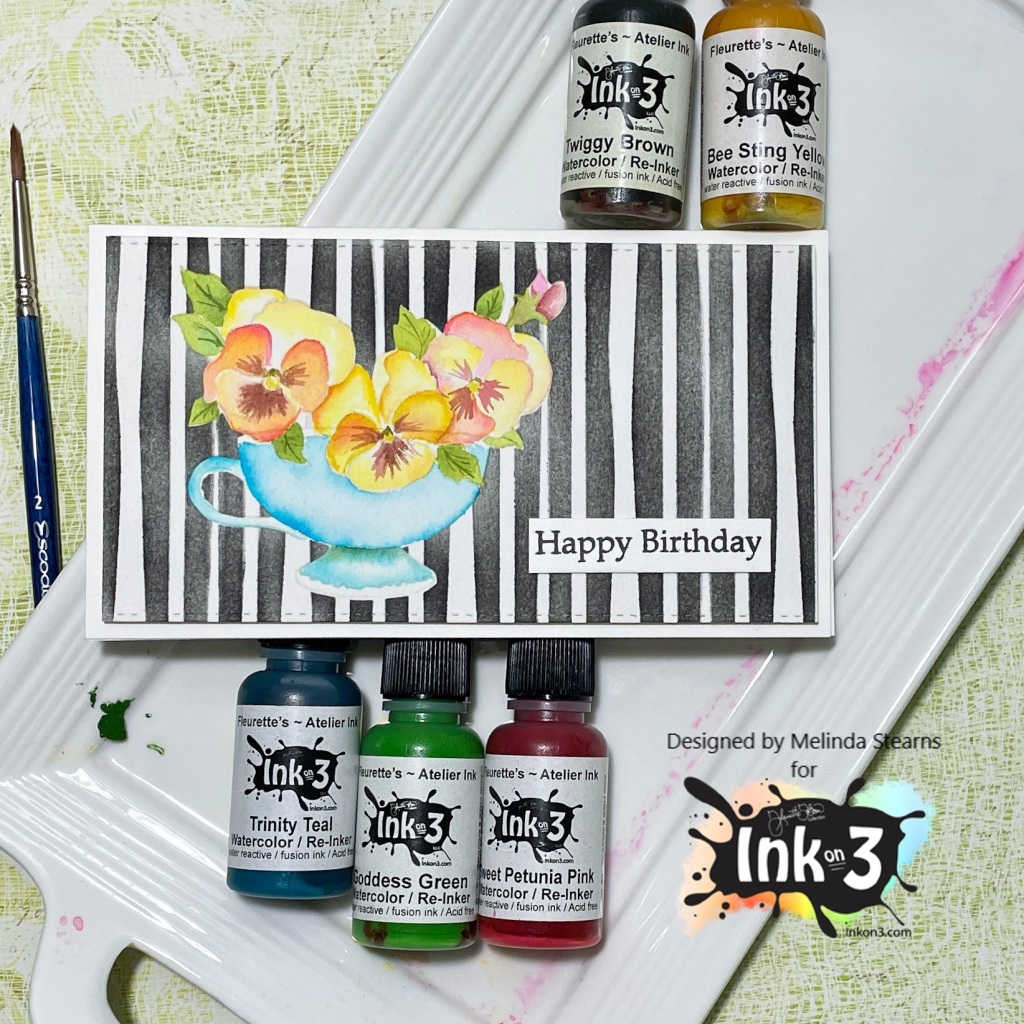
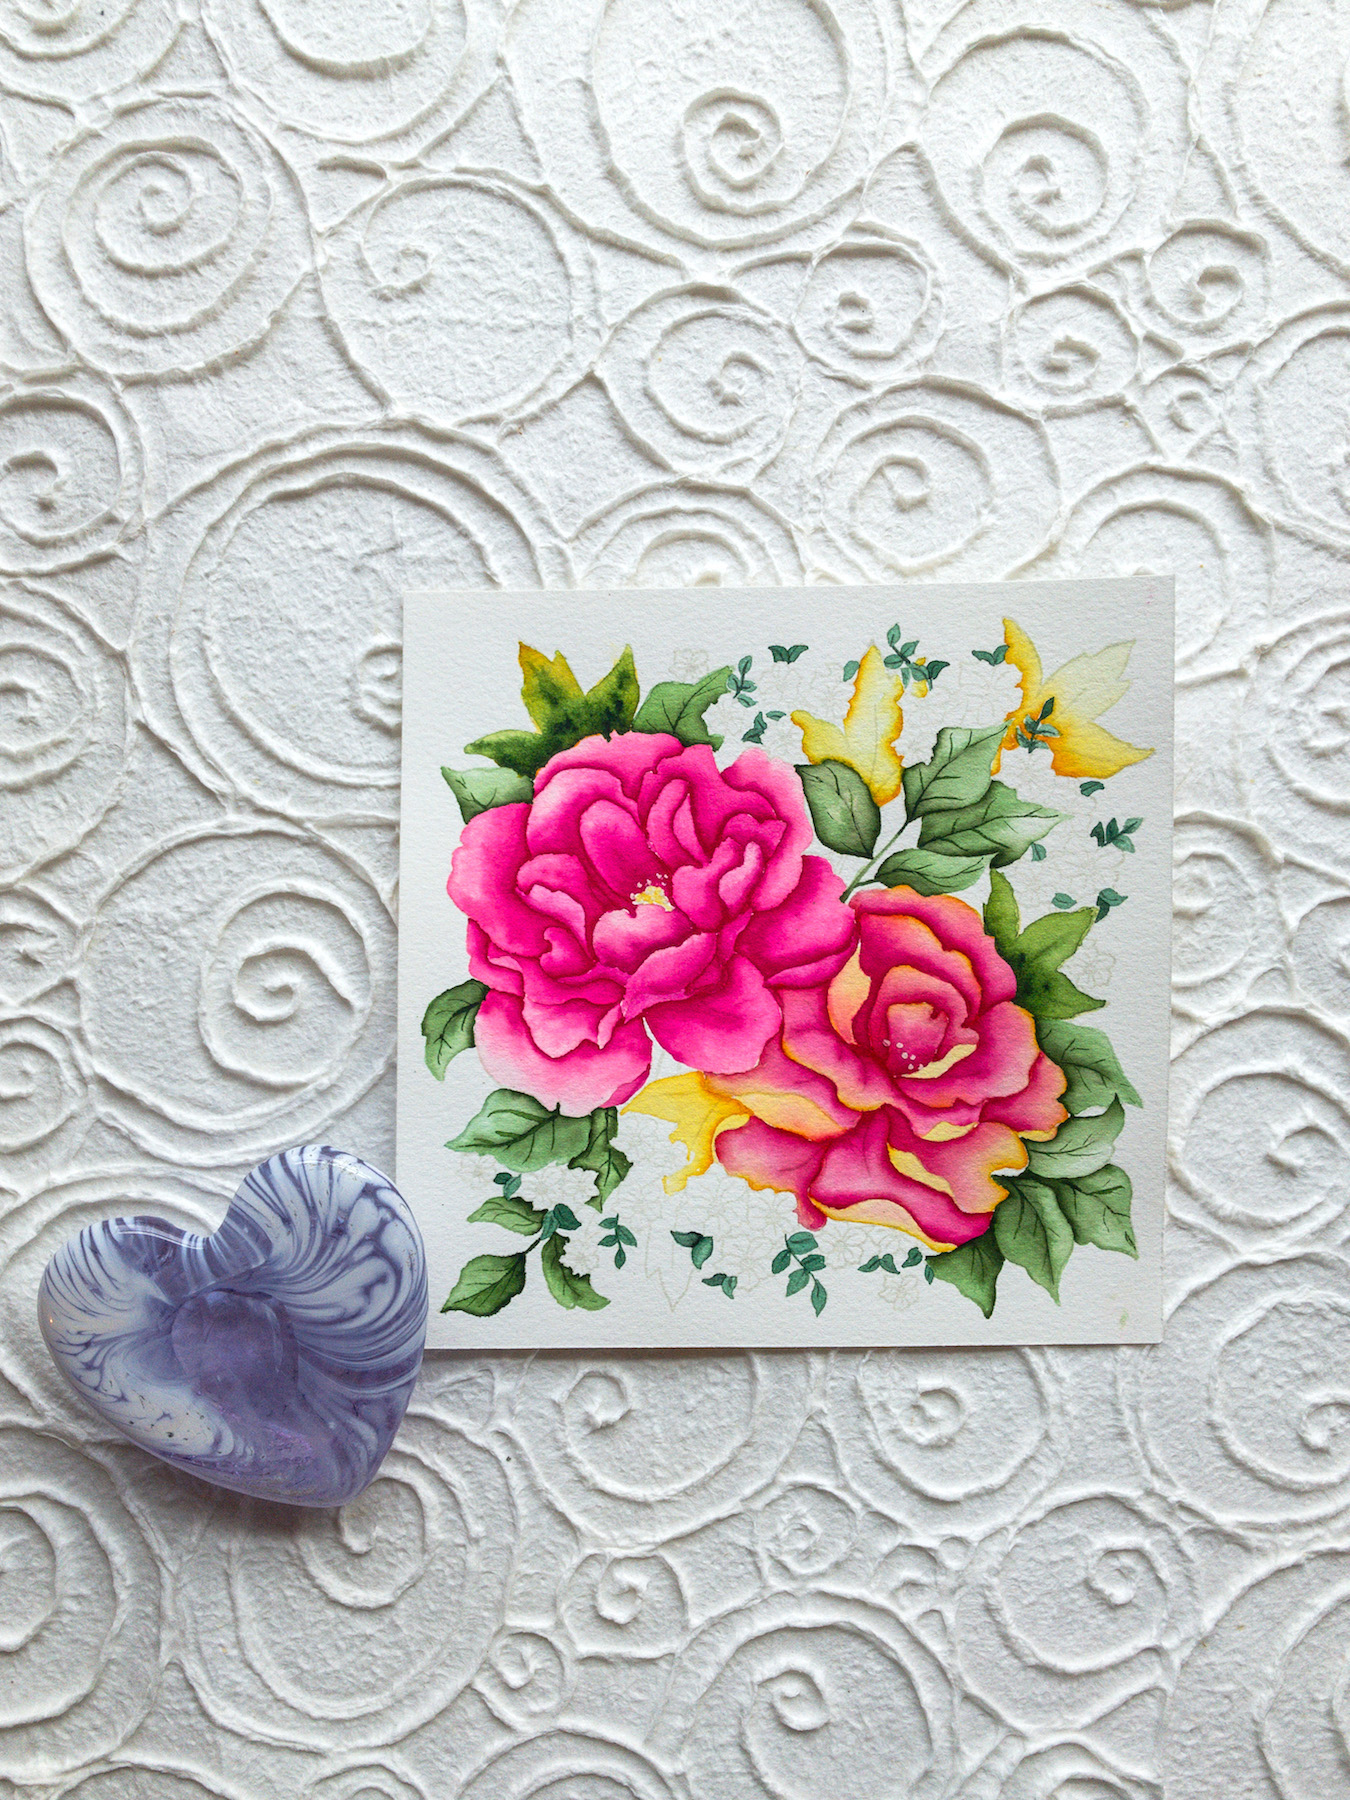
I was so excited when my friend Michele from, I Card Everyone reached out to me and asked me to play cards with her!! The prompt was floral, watercolor and a thank you. Did you know it’s International thank you card day today? I really love that there is a day dedicated to that!

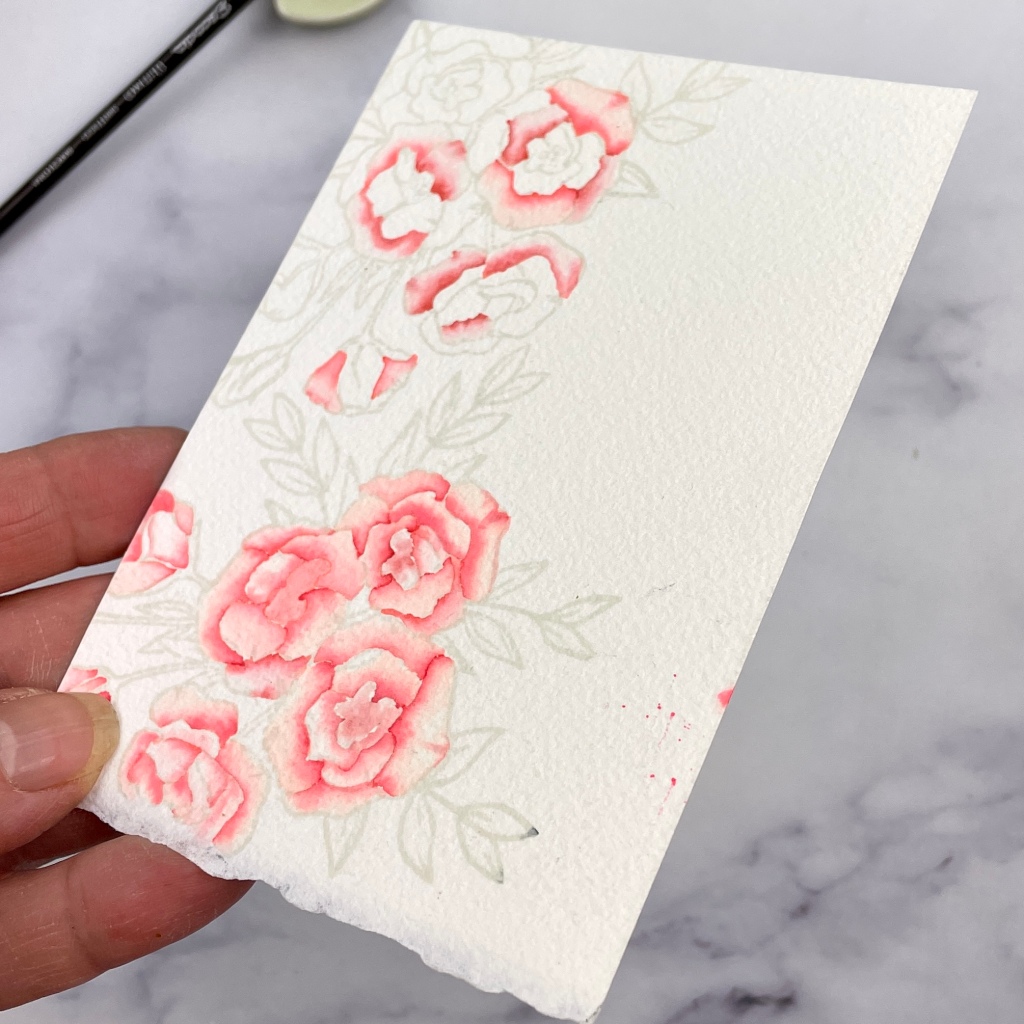
I adore watercolor and flowers so this is my kinda prompt, and who doesn’t need more thank you cards. I decided to color up this gorgeous new floral from Rubbernecker Stamps. I did not get far into this coloring before dropping my brush onto the edge. Sometimes I try to cover up these mistakes and sometimes…

I won’t bore you with all the details of how I colored this, but will impart a few things I’ve learned about watercolor. First and foremost, if it doesn’t look done its probably not so keep going. Watercolor is so much about layers so add those layers of color and add some unexpected pops of green like I did in this card. Final note, watercolor like most things takes practice, so paint a ton!! remember as card makers we can always make use of the junk with a few die cuts. Thanks so much for stopping by!!

Summer Blooms Collab


Today we have a fun craft collaboration between Trinity Stamps and Ink on 3. Design team members from both teams are here to share some inspiration using the Trinity Stamps card kit Summer Blooms featuring Ink On 3 mini ink cubes. To be entered to win the giveaway, all you need to do is comment on each blog along the hop! Trinity Stamps and Ink On 3 will be giving away a $25 gift card to their respective stores! Be sure to comment before 11:59 PM PST on August 26, 2021 to be entered to win.

Each company will post their random winner by September 1, 2021 at 10:00 AM PST! Make sure to check the

Trinity Stamps Blog and Inkon3 blog Now for some inspiration, at least I hope. I was so amazed by this and how much product there was to work with. I loved this kit so much I ended up making two cards for the hop. The first is a CAS inspired card. I have been really enjoying this style! I started by die cutting the tea cup 4 times with white card stock and the top layer I cut from brushed gold card stock. I stamped the small foral from the stamp set in Marigold orange and then inked the tips of the petals with the Sweet Petunia Pink and stamped again. I layered all the tea cup frames with glue and popped up the center with foam tape. I ink blended the new Curls stencil from Ink On 3 with some Twiggy brown for my card base. I though it looked perfect as a background to my tea cup.

For my next card I stamped the large floral in the kit using the Ink On 3 mini ink pads. I used a water brush to color the image. After thats was dry I stamped with the mini cubes again to bring back the detail. I used the Wonky Stripes stencil from Ink On 3 with some Paint It Black Atelier ink. This watercolor technique is so simple, I hope you’ll give it a try.

Next up is the amazing Erica’s blog CaCa Craft

The Great Outdoors

This months theme for Creating Kindness blog hop is one of my favorites and I had a fun idea. I live in Bigfoot country and I make postcards for my little local store, but have had a hard time finding an acceptable Bigfoot stamp. I contacted the owner of Magnuson Stamps and Nic camp up with this beauty.

I wanted to make a few cards as well as postcards so this challenge was my chance to give it a try. I made two cards, one is dimensional and the other is one layer watercolor. Well except for Bigfoot I popped him up.

Check me out on Instagram here—>https://www.instagram.com/itsacardknocklife/

for the dimensional card I die cut some trees and hill sides with Copic paper and colored them both with my markers. On the water color card I stamped with Distress inks and used a wet brush to move the paint around. I let that dry completely and stamp one more time to bring back the definition. You will need a Misti for the water color technique.

Check out what everyone else created for this months theme

Old Stable Crafts

Stampin’ With Marcy

Sense Of Whimsy

Mitosu Crafts

No-line Watercoloring

I went to my local nursery recently and discovered a pansy called Antique Shades that made me want to get out my Atelier Inks from Inkon3 and watercolor.

To start this card I cut down a piece of Arches bright white cold press paper to 5 3/4x 3 inches and stamped the pansy cluster from the Inkon3 Pansies stamp set with my Fadeout ink also from Inkon3. Mask the floral and stamp the tea cup included in this stamp set.

You can watercolor with the Atelier inks by swiping the pad on a plate or palette. I have the re-inkers and love the ease of use, but its not required. And of course you can use Distress Oxides or regular Distress inks. Make sure to start with a light layer and build up color for dimension. I used Bee Sting yellow, Goddess Green, Trinity Teal, Sweet Petunia pink and Twiggy brown to color my florals and a touch of Peacock blue for the tea cup. I used the brown to desaturate the green a bit and give it a more olive color. If you want to get more details check my Instagram page for the replay of this watercoloring process for the flowers.

I felt like the card needed something more so I decided to use the new Wonky Lines stencil from Inkon3. I cut a mask for the tea cup and flowers and masked them off. I taped down the stencil and used my Blackout ink. I love the look of florals with black stripes.

https://www.instagram.com/itsacardknocklife/

Plants

My favorite subject, plants and a great way to get started on the Creating Kindness design team. I’m super excited about joining the team and hopefully providing a little inspiration.

I’m so happy I was able to carve out some time for this card as Copic coloring is super fun and relaxing. I’ve been feeling a little too crazy busy these days and am always looking for some time for art, and am honestly missing the slowness of winter.

I started this card by stamping out Flower Bouquet with Copic friendly ink onto a mini slimline card front. I cut my card base 6″x7″ and scored the 7″ at 3 1/2″ Stamp twice in an arc across the top third of the panel. I colored this using the Kathy Racoosin color plucking method which is just picking a bunch of colors that appeal to you and making them work. This image is small, but open and easy to color.

I cut my colored piece 5 3/4x 3 1/4 inches and stamped the sentiment in the lower left of the card. I stamped the card base with my Random Dots background stamp for a touch of interest. I popped up the top layer onto the card base with some foam tape.

Thanks so much for stopping by and taking a look. I hope everyone gets to carve out their own craft time. https:,,,,,,

Watercoloring a Stencil

Hello everyone, I hope you all are having a good week and getting some crafty time in! I’m back for day 3 of the February release inspiration hop for The Rabbit Hole Designs. For todays release we are sharing the Corner Mandala stencil and boy is it amazing!!! Don’t forget that there is a GIVEAWAY, details at the end of this post.

I started out by cutting my slimline card panel 3 1/2 inches by 8 1/2 inches from some Arches watercolor paper. I placed the stencil on the top corner about 2/3 of the way down the panel. I used some no line coloring ink and a blending brush to ink this up. I added some stenciling on the lower portion of the card to balance things out. Next I watercolored the different parts of the Mandala stencil with some bright happy colors using my Karin markers. I added some Nuvo drops and white gel pen details for an extra touch of fancy. Next I cut a piece of black card stock and glued this to my card base. I glued my water color panel on top of that and added a sentiment from the Flamingo Botanicals stamp set. This is a fun and easy watercoloring technique and a great way to practice your watercolor.

Check out all the other designers on this hop for some amazing inspiration!

The Rabbit Hole Designs
Amanda
Amy Beth
Jenn
Kelly
Kim
Lauren
Melinda<—- you are here
Tangii<—– next up
Terra
Von Marie

GIVEAWAYS:

To celebrate the next three days of release, The Rabbit Hole Designs is giving away two savings vouchers; one to a lucky Instagram Follower and one to a lucky Fan Page follower. Winner will be chosen at random from the comments left on the INSTAGRAM post, and tagging friends, and also from commenting on the Fan Page post. So make sure to head on over to INSTAGRAM and look for the giveaway post @therabbitholedesignsllc and look for the post at The Rabbit Hole Designs Fan Page by 11:59 p.m. PST 01-28-2021. Winner will be announced on The Rabbit Hole Designs blog 01-29-2021.

For more inspiration check me out on Instagram Its a Card Knock Life

Coffee Loving Cool Cat

Hi everyone! Are you ready for another fun release and Inspiration hop for The Rabbit Hole Designs? I certainly am. There are some amazing GIVEAWAYS, the details are at the bottom of this post. Now onto this cool coffee loving cat.

I started off by watercoloring this cute cat from the Simple Things stamp set with my set of watercolor paints. I painted a little scene around him so he looked like he was out and about enjoying a coffee. I framed him so It looked like a photo and popped him up with foam tape. I added one of the hashtag sentiments from the kit to finish this card.

Thanks for stopping by and don’t forget to check out the design team inspiration!

GIVEAWAY:

To celebrate the next three days of release, The Rabbit Hole Designs is giving away two savings vouchers; one to a lucky Instagram Follower and one to a lucky Fan Page follower. Winner will be chosen at random from the comments left on the INSTAGRAM post, and tagging friends, and also from commenting on the Fan Page post. So make sure to head on over to INSTAGRAM and look for the giveaway post @therabbitholedesignsllc and look for the post at The Rabbit Hole Designs Fan Page by 11:59 p.m. PST 01-28-2021. Winner will be announced on The Rabbit Hole Designs blog 01-29-2021.

The Rabbit Hole Designs
Amanda
Jenn
Kim
Melinda <—– you are here
Von Marie<—- next up

For more inspiration check me out on Instagram Its a Card Knock Life

Day 2 Of the Birthday Release Blog Hop

Back for day 2 of this fun Birthday release for The Rabbit Hole Designs! For todays card I wanted to focus on the stencil. You’ll see why I used the word focus, like get out your 3-D glasses for this card! This is actually my first attempt at the foiling with sticky embossing paste. If you saw yesterdays post I talked a bit about it. This one didn’t work out as well, but I didn’t want to give up on it completely. I saw I had lots of uncovered areas and put the stencil back down and went over it with some pink distress ink and then off set the stencil and added a bit of blue. I finished it off with some pearls and another sentiment from the Sassy Birthday sentiment set. I wanted to add a bit of something to the sentiment strip and thought this Milar thread would be fun. I like the way it looks like a gift bow.

Party Time Stencil

Follow along for more inspiration!

The Rabbit hole designs

Jenn

Michelle

Amy Beth

Melinda <—– you are here

Tangii <—– Next up

Giveaways: To celebrate the next 3 days of release, The Rabbit Hole Designs is giving away two savings vouchers; one to a lucky Instagram follower and one to a lucky fan page follower. Winner will be chosen at random from the comments left on the Instagram post, and tagging friends, and also from commenting on the fan page post. So make sure to head over to Instagram and look for the giveaway post @therabbitholedesignsllc and look for the post at The Rabbit Hole Designs fan page by 11:59 PST 01-14-21 winner will be announced on The Rabbit Hole Designs blog on 01-15-21

2021 January Inspiration Hop Day 1

Hi everyone, thanks for stopping by. Its day 1 of the Inspiration Hop! One thing that we’re doing is wishing Rabbit Hole Designs a big ol happy birthday!!! The rest of the team is participating in a collaboration with MISTI so check that out. Where would we all be without our MISTIS, am I right? Check the bottom of this post for giveaway details.

Todays card features the Just Cake stamp set and stencil. This is such a fun set and its so versatile.

I started this card by making my background. I wanted to try foiling, but didn’t have a foiler. I tried out sticky embossing powder and then laid down my foil and ran it thru my die cutting machine. I didn’t get perfect adhesion, but it still looked good. I wanted to try the strip technique and opted for printed paper as I had lots of scraps I wanted to use. I popped up the cake for a little dimension and used one of the sentiments from the Sassy Birthday sentiment set.

Giveaways: To celebrate the next 3 days of release, The Rabbit Hole Designs is giving away two savings vouchers ; one to a lucky Instagram follower and one to a lucky fan page follower. Winner will be chosen at random from the comments left on the Instagram post, tagging friends, and also from comment on the fan page post. So make sure to head over to Instagram and look for the giveaway post @therabbitholedesignsllc and look for the post at The Rabbit Hole Designs fan page by 11;59 PST 01-14-21 Winner will be announced on The Rabbit Hole Designs blog 01-15-21

Just Cake stamp set

Party Time stencil

Check out the inspiration by clicking the links below!

The Rabbit Hole Designs

Jenn

Lauren

Amy Beth

Michelle

Terra

Von Marie

Tangii

Amanda

Kelly

Melinda <—– you are here

Tanna <—– next

Watercoloring With Karin Markers

Hello dear readers! This blog post finds me amidst a craft room renovation, I cleared everything out and started filling holes in the walls and painting.  After a few problems with primer not sticking in spots, I have finally put down my second coat. I will keep you updated on my progress, but, for now on to some card making.

I was in the mood for some watercoloring with my Karin markers. First step was to cut my Arches cold press paper, I prefer the bright white for florals.  This stamp, Peony Dreams from The Ton is quite large so I cut my paper 5 1/4 x 5 1/4 inches, the card base will be 5 1/2 x 5 1/2 inches.  I stamped the image with my Inkon3 Fadeout ink for no-line coloring.  I then started coloring with a light marker, adding color to the base of the petal and then moved the color with a damp brush. On one of the flowers, I started with yellow, and when that was dry I went over it again with some pink; the second flower I kept straight pink. I try and leave some highlights to get some depth. On the leaves I painted one varity with yellow and then green on the second coat; the other leaves I painted one color of green.

APC_0051.JPG

If I’m not sure what color to use of how they will blend, I stamp a few leaves and flowers on some scrap watercolor paper and test out a few combinations, so I’m sure I like my choices before painting on my panel. Watercolor lends itself to layering, so start light and build up color after each layer dries. Remember to enjoy the process, AND its okay if its not the masterpiece you had pictured in your mind. Believe me, I have lots of watercolor that doesn’t meet my standards; that is part of learning. So take some time to play with your watercolor markers and practice your technique. For example, try some layering and blending, Don’t forget to enjoy the process! have a happy healthy week.

APC_0094